Mint Chip Ice Cream

Recipe by Mandy Pagano

Recipe originally published on KetovangelistKitchen.com on 6/14/19. It has been heavily edited for re-publication.

mint-chip-ice-cream.jpeg->first()->description

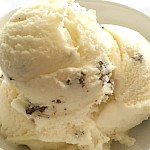
This recipe is based on my family's heirloom, home-churned ice cream recipe, which is an egg custard. In fact, the only things I changed were the sweetener type and amount, and swapped whole milk to a combo of cream and coconut milk. The entire rest of the ingredients list is the same, and it's my favorite because this is how I grew up eating it. This also means no gum fibers and no weird, stretchy texture that comes with the use of those ingredients. This particular version of my family's recipe tastes like the mint chip ice cream from a brand that rhymes with flyers, and has an awesome and  very "real" texture and mouthfeel. The kids have begged me to make it weekly since I started experimenting, so it's thoroughly child approved.

Now, I normally loathe posts that have eighty-gazillion words prior to the recipe (which is why my prefaces are always pretty short), but since this requires some explanation, I'm going to preemptively apologize for the post length, and get right into the notes.

Notes: The problems people have with making good keto ice cream mostly boil down to one thing: Most approved sweeteners freeze like a brick. Many chefs use all kinds of tricks, usually involving copious amounts of gum thickeners, glycerin, or alcohol, to try and keep it from freezing too hard, but it's a persistent problem.

The issue is that, until recently, the only sweetener that was (a) approved, and (b) didn't freeze too hard was xylitol, but xylitol is a bit of a problem ingredient. First off, if you're a pet owner, it's toxic to quite a few animals, and in dogs it can kill in minuscule quantities. Consequently, most dog lovers tend to not want xylitol hanging around where a small oopsie could cause Fido's sudden demise.

Secondly, xylitol tends to cause a lot of gastric distress. Imma raise my hand here, because even though it works extremely well in keto ice cream it absolutely kills my stomach. More than a few bites has me bent over with gastric pain, and that's no good.

Lastly, unlike the other approved sweeteners, xylitol has a much more substantial glycemic effect. Whereas stevia and monk fruit are a zero on the glycemic index (GI), and erythritol rates a one, I've seen xylitol listed anywhere from a 7 to a 12, depending on the origin country in which the chart is issued. So, while its effects on your blood glucose aren't going to be like real sugar (which is a 60 on the GI), there will be more of a rise in both glucose and insulin than other approved sweeteners.

So, that leaves us with using xylitol with its potential pitfalls, or using an approved sweetener and having to wait a half hour after setting it on the counter to be able to get it soft enough to scoop.

Or does it?

Here is where I list your options, and they include some newer sweetening products:

1. Xylitol: as mentioned above it keeps ice cream texture, but has other issues. It is fairly inexpensive, but it is a sugar alcohol and one notorious for causing digestive upset. GI is variable but usually listed between 7 and 12.

2. Allulose: a newer sweetener on the market, which Certified Ketogenic has approved and listed as friendly. Used in over 1000 sugar free products in Japan, and some evidence appears to show that it actually blocks the uptake of real glucose. More expensive and most likely special order. Will keep ice cream texture, although it does freeze a little harder than xylitol, in my experience. It also tastes better than xylitol, in my opinion. GI of zero.

3. Bochasweet: a very new sweetener made with an indigestible sugar extract from the kobocha squash. Freezes beautifully (by far the best of the three options), tastes the best, but has very little research on it, and is also special order and is very expensive. GI of zero.

My own preference is for allulose (because it's not insanely costly like Bochasweet, and tastes good without causing me massive bloat) but these are your options. I have tested all three and they work interchangeably by weight (so yes, you need to measure it out on a kitchen scale). This recipe includes the least amount of sweetener that will taste good while also keeping good texture. If you like it sweeter, you may feel free to add more, as desired.

I'm also giving you a choice in preparation method. I've listed instructions to make a classic egg custard base on the stove, or to make your custard in my own invented method. The former method works beautifully, and yields traditionally thick and creamy custard, but does require you to stand there at the stove and stir, so you have to pay attention or else you'll have scrambled eggs.

The latter method is my own concoction, loosely based on the Italian method of meringue making, that will cook the eggs to a safe temperature (a minimum of 160 degrees F for a custard) without having to stand over the stove with a whisk, but it does require a stand mixer. The custard won't be quite as thick as the stovetop method, but honestly it's my favorite for the ease and because it comes out the most like it did when my mom made it for me as a kid.

You may try out a hand mixer with the second method, but it's a little more precarious in my experience. If all you have is a hand mixer, you might ask a member of your household to assist so you're not juggling too many things at once.


[tasty-recipe id="3182"]

Mint Chip Ice Cream

  •  Author: Mandy Pagano
  •  Prep Time: 24 hours
  •  Cook Time: 10 minutes
  •  Total Time: 24 hours 10 minutes
  •  Yield: Approx 8 servings
  •  Method: Egg custard
  •  Cuisine: American
  •  Keywords: comfort-food, desserts, easy, ice-cream, summer

Ingredients

  • 110 grams allulose, Bochasweet, or xylitol
  • 1 1/2 c (12 fl oz) heavy cream
  • 1 1/2 c (12 fl oz) boxed coconut milk (the thin stuff in the carton)
  • Generous pinch salt
  • 3 whole eggs, large
  • 1/2 tsp vanilla extract
  • 3/4 tsp peppermint extract
  • 20 drops liquid vanilla flavored stevia drops
  • 36 g (about 11 squares) Lily's dark chocolate, chopped as desired (chips are fine, too)

Instructions

Stovetop Custard Method:

  1. Prepare your ice cream maker as per its instructions. This means if you have a bowl that needs to be chilled ahead of time, do it well beforehand, as per your machine's instructions.
  2. When ready to make the custard, set a fine mesh strainer over a large lidded bowl or container. Set aside.
  3. In a large, heavy-bottomed saucepan, combine sweetener, heavyweight cream, coconut milk, salt, and whole eggs.
  4. Whisk to combine.
  5. Set on the stove over medium heat, whisking continually. Do not stop whisking. You don't have to beat it until your arm falls off, but you do need to keep it moving, and be continually scraping the bottom of the pot, so as to keep the egg from scrambling.
  6. Cook over medium heat, whisking the entire time, until the custard is thickened enough to coat the back of a wooden spoon. This usually takes between 20-30 minutes.
  7. Once the custard is cooked, immediately remove it from the heat and whisk in the extracts and stevia.
  8. Pour the custard through the fine mesh strainer and into your storage bowl. Let cool slightly, then put the lid on and chill thoroughly. Ice cream custard should be aged a minimum of four hours, but longer is better. 8 hours or overnight yields the best and most consistent results.
  9. Once the custard has aged, follow your churn's directions to freeze. In my small Cuisinart, for example, it typically takes 15 minutes to churn, but yours may vary depending on your machine. You are looking for a soft-serve texture. If you get to where it looks like hard ice cream, you've churned too far. It will still be ok, but you may need to scrape it out of your churner to get it all into your freezing container. Fair warning and all.
  10. In the last few minutes you may sprinkle the chips into the churn, OR you can quickly mix them in by hand when transferring to your freezing container.
  11. Transfer the churned ice cream to your freezing container, put the lid on, and freeze a minimum of four hours. Eight or more for best results.

Stand Mixer Method:

  1. Prepare your ice cream maker as per its instructions. This means if you have a bowl that needs to be chilled ahead of time, do it well beforehand, as per your machine's instructions.
  2. When ready to make the custard, set a fine mesh strainer over a lidded bowl or container. Set aside.
  3. Beat eggs, vanilla, peppermint extract, and liquid stevia on low briefly just to break up the eggs and combine. Turn mixer off and set aside.
  4. In a large saucepan, whisk heavy cream, sweetener, and coconut milk together, and set it over medium heat.
  5. Cook until the mixture comes to the beginning of a simmer, whisking occasionally to keep a film from forming on top. You want to pull it off the heat as you see the first few boil bubbles come to the surface.
  6. Turn the stand mixer on to medium and begin beating eggs.
  7. Slowly pour the very hot cream mixture into the eggs as they're beating beaten in the stand mixer.
  8. Once all the cream mixture is in and being incorporated, continue running the mixer at medium speed for five minutes, or until the custard is thick enough to coat the back of a wooden spoon.
  9. Pour the custard through the fine mesh strainer and into your storage bowl. Let cool slightly, then put the lid on and chill thoroughly. Ice cream custard should be aged a minimum of four hours, but longer is better. 8 hours or overnight yields the best and most consistent results.
  10. Once the custard has aged, follow your churn's directions to freeze. In my small Cuisinart, for example, it typically takes 15 minutes to churn, but yours may vary depending on your machine. You are looking for a soft-serve texture. If you get to where it looks like hard ice cream, you've churned too far. It will still be ok, but you may need to scrape it out of your churner to get it all into your freezing container. Fair warning and all.
  11. In the last few minutes you may sprinkle the chips into the churned, OR you can quickly mix them in by hand when transferring to your freezing container.
  12. Transfer the churned ice cream to your freezing container, put the lid on, and freeze a minimum of four hours. Eight or more for best results.

Nutrition

  • Serving Size: Approx 2 scoops
  • Calories: 207.7 cal
  • Fat: 20.5 g
  • Carbohydrates: 18.3 g
    • Fiber: 1.3 g
    • Net Carbs [total carbs - (fiber + sugar alcohol)] : 2.3 g
  • Protein: 4.1 g

This content was printed from ketogenic-success.com

Direct URL: https://www.ketogenic-success.com/recipes/mint-chip-ice-cream/

Articles, recipes, keto products, events, and other developments specific to the keto community. And it all starts with a free Keto Food Guide.


hello@ketogenic-success.com

740 4th St. N.
Ste 187
St. Petersburg, FL 33701
USA